Wednesday, January 4, 2012

Mexican Pancakes

0 comments
Blogland! How I've missed you! My posts have been few and far between lately, only because my youngest has decided that she no longer needs to nap. But today she isn't feeling well and a nap keeps her from being too cranky. So just a quick post about a recipe that my family LOVES! I'm not sure how we came up with it or if it was just something that was passed down. Mexican pancakes, like pancakes...but better! Get your alka seltzer ready and bring on the enchilada sauce!
Heres what you need:
    

First take the tortilla and warm up for about 20 sec in the micro then put a little oil in your frying pan. Let the tortilla sit in the frying pan until its warm and toasty, but not TOO toasty. You want to be able to cut it with a fork later and not hear "crunchies". In a separate pot you need to warm your sauce.
 Next cook your egg. I like mine runny. When the sauce and the egg yokes run together its glorious! Then place your egg on top of your tortilla.

Then smother with enchilada sauce.


Next comes cheese and chopped onions! If you dont work quick enough it gets cold. Give them a nuke in the micro to melt the cheese and your good to go. You can also add salsa and sour cream if you like!  Its best to make 3 or 4 on top of each other and that way it looks like a "stack" of pancakes.
Hope you love!

Saturday, September 17, 2011

True life at the kitchen table

0 comments
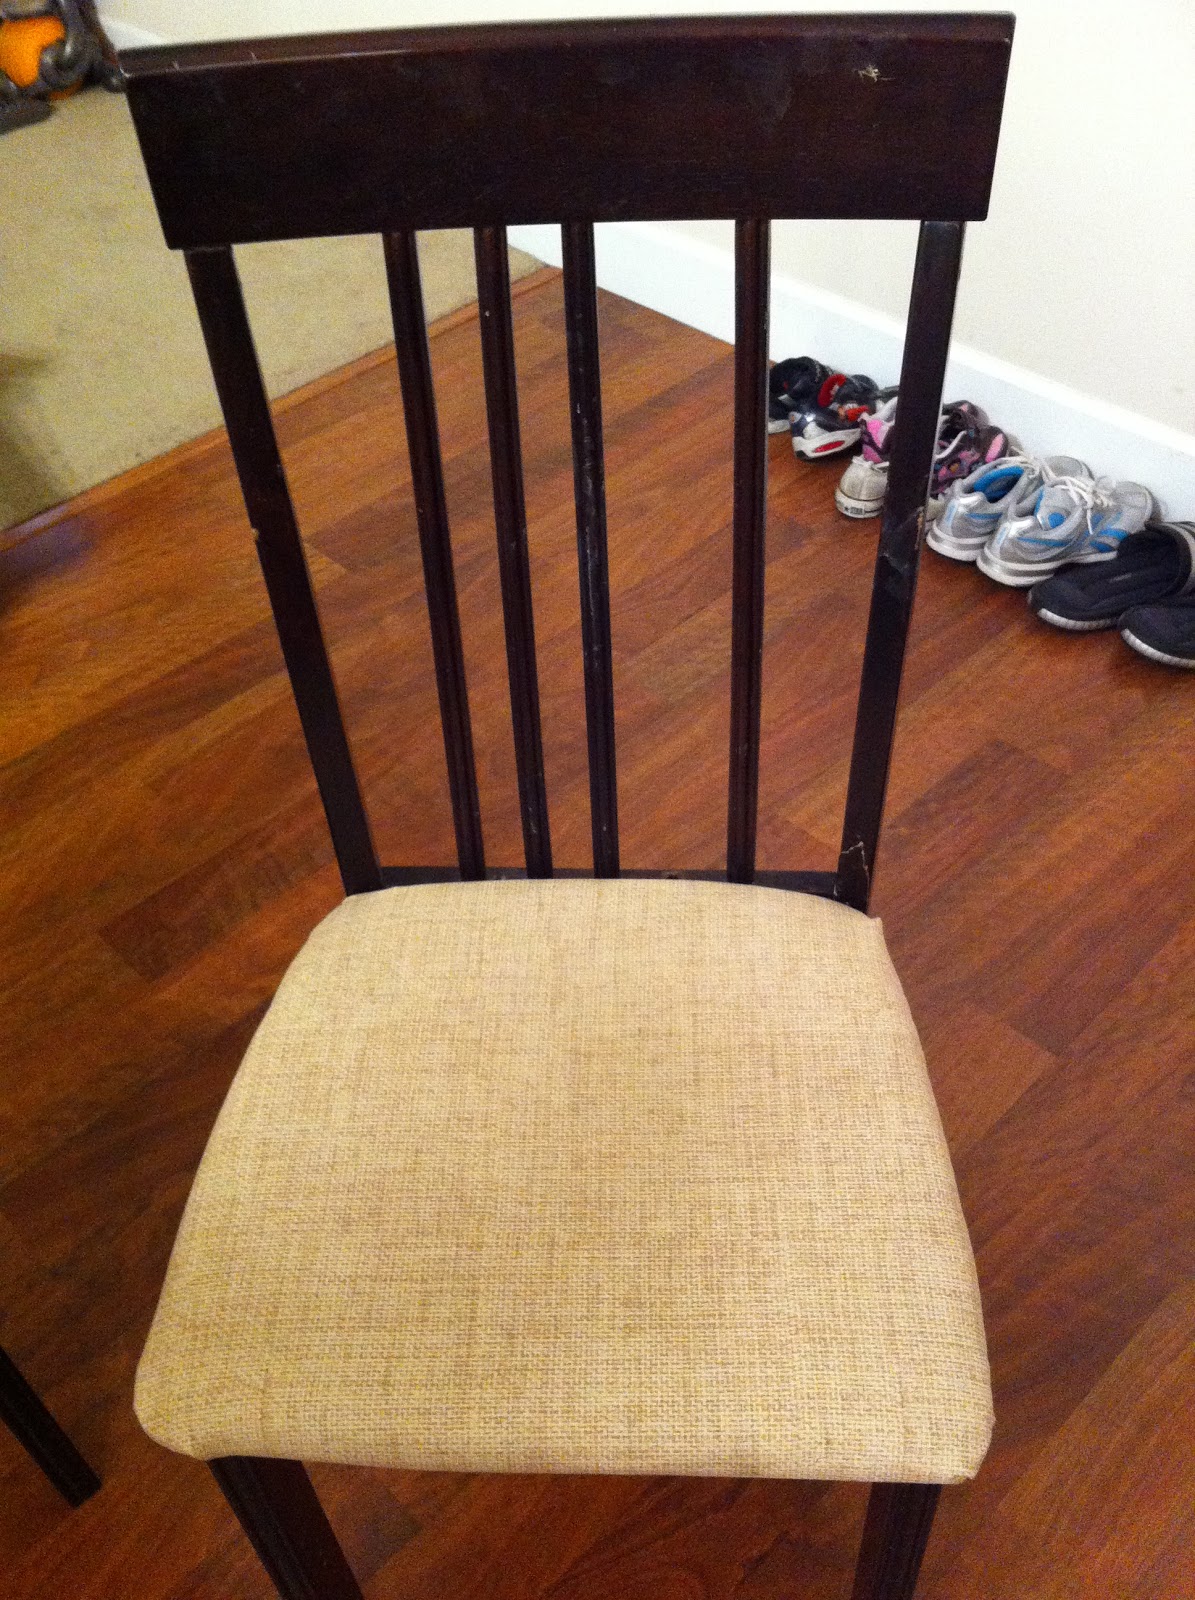
My kitchen table is very important to me. Its where everyone comes together, the place where we talk, have coffee and make important decisions. When we first got married our kitchen table folded up (so did the chairs, only 3 of them, the 4th chair was broken) and rolled away :) Then we upgraded to a wonderful chocolate brown table with.... wait for it... 6 chairs!! You would of thought we had won the lottery! The chairs were covered in this tan microfiber suede. After a few years and a few kids this is what those chairs look like. Its not pretty. Its downright gross. True life~with kids. I've cleaned and cleaned them and it didn't seem to help.
I also discovered that my daughter had put stickers on the inside of one of the legs. Princess stickers anyone?
 I got tired of looking at the dirty seats and decided to take on a project. I found this home decor fabric at Joanne's. It was on sale! 2 yards and only 14.99, down from 10.99 a yard! We all know that home decor fabric can be so expensive, when I saw this I snatched it up!
 More true life-me ( sans makeup) doing my mommy thing and trying to be crafty at the same time. I stay busy.

The hardest part was using the scary air compressed staple gun. I just knew that I was going to hurt myself! Its how I roll! But surprisingly I didn't! Go me! Heres how they turned out....

I like! The chairs themselves still need to cleaned. And I'm off to buy a big bottle of scotch guard until my kids are spill proof.. How long will that be ya think? :)

Tuesday, September 13, 2011

Pumpkin spice latte cupcakes

0 comments
So here it is, the greatly anticipated Pumpkin Spice Latte cupcakes! I love anything with pumpkin it! It feels so fall-ish! These are the moistest cupcakes I have EVER made. If you want to see the original recipe you can see it here, but I didn't exactly stick to it... also, if you want some great recipes then subscribe to Annie's Eats (where I got this from)! So, heres how it went!
What you need:
2 2/3 cups all-purpose flour
2 tsp. baking soda
2 tsp. baking powder

In the original it says to use all the spices for the pumpkin. I just used like 2ish table spoons of the "pumpkin pie" spice. Im such a cheater! 
1 tsp. salt
1 (15 oz.) can pumpkin puree- I used the kind that was already spiced. Not the puree, but the kind you can cheat with and just pour into a pie dish ;)
1 cup sugar
1 cup brown sugar
1 cup  vegetable oil
4 large eggs

It also calls for espresso powder- 3 tbs-but I wanted to make them a little more kid friendly. Can you imagine my kids with caffeine?? No thank you! Combine flour, baking soda, baking powder and pumpkin spice. Stir well. Then combine all the other ingredients. If you have a great mixer use it!  Slowly add the flour mixture to the puree. When its all mixed it should look kinda like this
Pour them into the cupcake wrappers. Bake at 350 for about 20 mins. If you fill the wrappers more than half way then you will need more bake time. 
To make the frosting you will need
2 1/4 cup heavy whipping cream that has been in the fridge for at least an hour(chilled)
1/2 powdered sugar
This is by far the hardest part. Whisk the heavy cream slowly then add the powdered sugar a little at a time. Whisk it until it creates stiff peaks. It should look like frosting but more fluffy. Now you can make it pretty by using a decorating bag and tip to frost them. The whipped cream has to be COLD and it warms up quickly. I had to quit halfway through... refrigerate the whipped cream and then come back and finish up. You can add caramel drizzle and cinnamon. I got a little impatient and only put cinnamon.
I had no fall colored cupcake wrappers! Only bright ones, but I kinda like how they looked.
These were a huge hit at my house! I left some unfrosted and they go great with a cup of coffee in the morning. Hope you are welcoming fall with open arms!


Friday, September 9, 2011

BEAVERS & ducks

0 comments
So it seems... that football season is here! We all have our favorite teams or our favorite rivalries. Here in Oregon it's between the Beavers 

and the ducks. You can already see I have some serious loyalties!  I love to watch football but you wont catch me rooting on the ducks. Ever. I just can't! But when a friend asked me to help her stitch up her lucky duck flag, I had to help. She can't help she chose the wrong team to root for... right? :) My sewing machine has seen the color, yellow and the color green. But never at the same time!! 


Look at that sad flag. Its so pitiful and torn.

 It's seen better days...
I basically had to chop a good inch off the top and bottom. Then I hand sewed the flag back on the plastic rod. Its smaller but its what had to be done to save it. 

Here we are on the way back from cheer camp together. Don't we look exhausted?! And yes, there is 40+ teenage girls behind us. If we can get through that together then I can sew up a little flag!


Up next- Southern mint sweet tea!


Wednesday, August 17, 2011

Getting back to it and a little contest!

0 comments
So, Im back from vacation! Yipee! I love being away, but there's something about coming home to your own bed that is so relaxing. I crashed the first night home. The kids were so glad to be home they slept till 9 the next morning(being the uber paranoid mom- I checked to make sure they were still breathing) because sleeping in at our house is unheard of :)
Being home means getting back into a routine. Any routine. Please. Right now were on a day to day, lets-see-if-we-can-make-it-routine. Anyways, being home means getting back to my sewing!!

I got my first sewing machine for Christmas a few years back. I loved my machine. At the time I didn't know what I was doing. I was just learning and most of the projects I did are so bad, I would be embarrassed to show them to you. Trust me. Lucky for me, I had a sewing fairy ( my MIL) who patiently helped me along. Being a beginner, my Singer Inspiration was perfect for me. But when I got home from vacation it was giving me more problems than ever before. Just a quick backstory....before I had my sewing table, I sewed at the kitchen table and well....one day I tripped over the cord and my sewing machine went flying across the kitchen floor and ever since then it hasn't worked quite right. But I kept right along!!
So, my sewing fairy felt my frustrations and....

Isn't she purdy?
This is the mess I made in and attempt to clean up my sewing space.

Yes. I like to color coordinate my thread. Im a freak. I know.
The ONE clean corner of my table.
I'm jealous of all of you who have wonderful work spaces. I dream of long counters where I can lay out all my fabric and do cutting-NOT on the floor. A room that is specifically me. I feel selfish saying it, but its true! For now I will be happy with my corner of the living room!
One last thing.... because Im still a child inside(sometimes) who wants to name my new sewing machine? The best name will get one of my fantastic aprons! Just leave a comment. And if your new "WELCOME"!

Thursday, August 11, 2011

Home made Lip Balm! Yes Please!

0 comments
Oh. My. Word. Delia over at Delia Creates made her own balm and I'm loving it. I'm kind of a lip gloss/balm junkie. I love having tons of them, in different colors and flavors! This would just add to my collection. You should check out her other awesome projects!


Sunday, July 31, 2011

Vacation!!

0 comments
You know I love you all right?! But sometimes you just need to get away...and thats what the kids and I have done! We are in the fantastic state of Texas visiting my family! And yes, its HOT HOT! I like it though. I had a moment where I could feel the sun scorching my skin and I decided it was time to come inside :)
Here are a few pictures from our vacay so far. I promise I will be back and September holds something really cool! Promise.

My kids are awesome travelers! PJ is making sure we are safe and Eva has the barf bag... which we needed after we landed!
Were eating at our favorite restaurants! Loving the tex-mex! I swear this green sauce ( not to be confused with guacamole) is the most addicting thing I have ever tasted.
I'm trying to fix my awesome tan line from my Toms. So far no luck.
And spending time with family! Love them!

Hope your all enjoying summer!


Friday, July 15, 2011

Its giveaway time!

0 comments
Who loves free stuff?!!! I do! I have a lovely friend over at 2 Peas Boutique. She makes some amazing hair accessories! She is hosting a 500 fan celebration giveaway! WOHOO!!
Here are the rules:

The giveaway ends July 24th at 8pm PST. Winners will be announced sometime that evening. I will put the winners name in the caption of the item they win.
*Please read the rules and comment "agree" on the "rules" photo before participating
.
*To enter to win, like her page (if you haven't already), and the pages of the vendor for the
item(s) you would like to win.

*Comment on the photo of the item you would like to win with your first name, and email address so that we can contact you after the giveaway if you are the winner. (if you don't feel comfortable with leaving your email that's ok, but you are responsible for getting ahold of me if you win to get the email of your vendor)

*If you purchase an item from a vendor during the giveaway you get an extra entry, please make a SEPARATE comment on that vendor's photo if you do so. Only one extra entry per person per vendor.

*Winners will be chosed AT RANDOM using random.org. Each item get's it's own winner so there are many chances to win. One person CAN win multiple items.

*Once winners are announced I will email you will the vendors email address and from there on it is YOUR responsibility to contact them to claim your prize.

** If a vendor has requested the winner pay shipping, it will be noted on the photo caption and must be paid to the vendor before item will ship. DO NOT enter for a prize that does not have free shipping if you do not want to pay for it.**


Please remember that once you are stated as the winner and I have given you the email of your winning vendor, YOU are responsible from there on to contact your vendor and claim your prize.

GOOD LUCK!

Wednesday, July 13, 2011

Linking up!

0 comments
Im linking up to a sweet blog called Tea Rose Home! Check it out!

Tuesday, July 12, 2011

Calender holder gets a makeover

0 comments
I bought this plain white calender holder at a garage sale for $5. I turned it sideways and an idea instantly came to me! So, here's what I started with.
Its cute and kinda plain...
A few of things you'll need:
-Spray paint ( I chose a flat black)
-Cardboard
-Batting
-Fabric
-Hot glue
-Chalkboard paint( pic below) This is the coolest stuff ever! I found it a little pricey but if you shop around you can find it for about $4.

Go ahead and spray paint away! Once it's dry, use the chalkboard paint on one of the sides. I used two coats of it just to be sure that the peg board on the back didn't soak it all up.

You can now measure a piece of card board the size of the other side. Take that an add a half an inch. Having too much and trimming it down is easier than cutting a whole new piece. And just a FYI scissors are NOT ok for cutting cardboard( Im sure you already knew that though). Its painful and slow but I was mid project and feeling a little impatient :)
Mine obviously isn't perfect.


Next comes the batting and hot glue. I put the bandaids out because I ALWAYS seem to hurt myself when Im doing a project like this. Its a "just in case"
Cut your batting the same size as your cardboard and hot glue all the edges down. Then take another layer and do the same thing. You want it pretty fluffy.
Now take your fabric and lay it over the top and then turn your cardboard over. The edges do not have to be perfect as long as it fits your good to go. Then pull the fabric tight and glue it down. Do this all the way around. If you have ever re-upholstered anything this is alot like it. Just with hot glue!
Imperfections hidden! Looking good!
Slip it in and makes sure it's secure and.... your done! I love it! I put it right above my sewing table. I always have scraps, ribbons and coupons and the pin-board is perfect for them!
Love, create, simplify. My words to try and live by. Hope you have fun! If you happen to make this project email me and let me know if it turns out for you!

Saturday, July 9, 2011

A post of random things...

0 comments

First things first. Its quiet...which means that Eva is napping! What?! Yes, the little one who has refused to nap for a week has just worn herself out. Now the house is quiet and I don't know where to start. I think I wandered around for almost 30 mins wondering what to do first. Floors mopped? Check! Moving on to the blog!
Since it was nice out the kids, MIL and I decided to head out to our local farmers market. I was pleasantly surprised, the price of produce is cheaper and fresher! We love fresh veggies, but I have a hard time justifying the price, when they look wilted and brown. So the farmers market might be my new destination for cool, crisp fresh food! One random thing I picked up today was Dill. I like dill and I like to use dill. This is fresh and I'm going to try my hand at drying it myself. It can't be that hard right?Along the lines of the rising prices of food...my garden is coming along nicely! The kids love eating from it, I really like to see them excited about it as well! This is the first year we've had a garden and I wasn't sure where to start. I heard that peas can survive almost anything. So, I planted them. Now we have peas, peas and peas!

On to the next random topic! I found this cool calender holder at a garage sale for $5. I instantly knew what I wanted to do with it! I'm off to find our big ol stapler...I promise to post the tutorial when I'm done!
Lastly, I decided to open an Etsy shop. I've been thinking, stewing and praying about it as well. Now that it's open I'm just so stinkin excited about it! I have to say "Thank You" to my wonderful and supportive husband who made my Etsy banner. He's like a super skilled web/java ninja! For real. So hop on over and check the shop out!
Thanks for sticking with me!


Moms the Word Copyright © 2009 Baby Shop is Designed by Ipietoon Sponsored by Emocutez